Recipes Under 600 Calories

Jammy Coconut Squares

These delicious gluten-free squares have a surprise ingredient – potatoes! Full of the delicious sweetness of jam and coconut, and under 300 cals a slice, these little cakes are a gem

Jammy Coconut Squares

Prep Time 20 mins
Cook Time 45 mins
Total Time 1 hr 5 mins
Servings 18

Ingredients
  

  • 250 g 8oz potatoes, peeled and chopped
  • 1 tbsp milk
  • 250 g 8oz butter, at room temperature
  • 250 g 8oz golden caster sugar
  • 3 large eggs
  • 1 tbsp vanilla extract
  • 250 g 8oz gluten-free self-raising flour
  • 6 tbsp strawberry jam
  • 2 tbsp desiccated coconut
  • 18 x 28cm 7 x 11in tin, greased and lined

Instructions
 

  • Set the oven to 180°C/Gas Mark 4. Put the potatoes into a heatproof bowl with 175ml (6fl oz) water and microwave on High for 10 mins, until tender. (Alternatively, boil the potatoes in a pan.)
  • Drain the potatoes, add the milk and mash them until smooth.
  • Cream the butter and the sugar, until pale and fluffy. Gradually beat in the eggs and vanilla extract.
  • Fold in the flour and mashed potato. Spoon into the prepared tin and bake for 45 mins, until a skewer inserted into the centre, comes out clean.
  • Spread the jam over the top of the the warm sponge and sprinkle with coconut. Cool, then cut into 18 squares. Serve with custard, if you like.

Gluten-Free Coconut Cookies

These crunchy coconut biscuits are perfect for dunking in tea and being gluten-free, great for anyone with a wheat allergy.

Gluten-Free Coconut Cookies

Prep Time 15 mins
Cook Time 15 mins
Total Time 30 mins
Servings 16

Ingredients
  

  • 60 g 2oz butter, softened
  • 125 g 4oz caster sugar
  • 1 large egg beaten
  • 75 g 2½ oz desiccated coconut
  • 150 g 5oz gluten-free plain flour
  • 8 glacé cherries halved
  • Baking sheet s lined with non-stick liner or baking parchment

Instructions
 

  • Set the oven to gas mark 4 or 180°C. Tip the butter and sugar into a bowl and beat them together until smooth. Add the beaten egg. Reserve 2 rounded tablespoons of coconut and add the rest to the creamed mixture and then the flour. Mix all the ingredients together to give a smooth, firmish dough.
  • Divide the dough into 16 pieces and roll each piece into a ball and then roll them in the reserved coconut. Flatten the balls to about 4-5cm (1½-2in) in diameter and place them on the lined baking sheet(s). Press half a glacé cherry on top of each biscuit.
  • Bake the biscuits in the centre of the oven for 15-18 mins, or until they are a light-golden colour.
  • Remove the baking sheet(s) from the oven and leave the biscuits to cool for a few minutes, and then slide them on to a wire rack to cool completely.
  • Storage and freezing tips: The biscuits may be stored in an airtight container for up to 2 days. They can also be packed in a freezer container and frozen for up to 1 month. Allow the biscuits to defrost, and then warm them through in a hot oven to refresh them before serving.

Notes

Top tip from Sue McMahon: The cookies spread slightly during cooking, so don't place them too close together on the baking tray.
Extra info: We've used Doves Farm gluten-free plain and self-raising flours, available from most supermarkets and specialist health food shops.

Wheat Free Mini Muffins

Wheat free mini muffins are stuffed with Parma ham and button mushrooms to make gluten free canapes that are so easy to make

Wheat Free Mini Muffins

Prep Time 5 mins
Cook Time 25 mins
Total Time 30 mins
Servings 12

Ingredients
  

  • 6 slices Parma ham or prosciutto
  • 10 g butter
  • 100 g button mushrooms finely sliced
  • 2 medium eggs beaten
  • 3 tbsp milk
  • 1/2 tsp English mustard
  • 50 g Cheddar grated

Instructions
 

  • Preheat the oven to 190C/Gas 5. Halve the lengths of Parma ham and use each half to roughly line an oiled 12-hole silicon mini muffin tray.
  • Melt the butter in a frying pan, add the mushrooms and fry for 10 mins until golden.
  • Mix the eggs, milk, mustard and cheese into the mushrooms and season. Pour into the lined muffins and bake for 10-15 mins until risen and set.

Notes

Make up to 2 days in advance, reheating in a hot oven for a few mins.

Orange Fairy Cakes

These dairy-free, gluten-free fairy cakes taste as good as they look and great for any allergy sufferers. Tuck in for a tasty guilt-free treat.

Orange Fairy Cakes

Prep Time 15 mins
Cook Time 15 mins
Total Time 30 mins
Servings 8

Ingredients
  

  • 125 g 4oz gluten-free plain white flour
  • 1 level tsp gluten-free baking powder
  • 125 g 4oz dairy-free spread
  • 90 g 3oz Fruisana fruit sugar, plus 1 extra tbsp (alternatively, use 125g/4oz caster sugar)
  • 2 medium eggs
  • Grated rind and juice 1 large orange
  • 8 muffin tins lined with fairy-cake paper cases

Instructions
 

  • Set the oven to 190°C (375°F, gas mark 5).
  • Put the flour, baking powder, spread, sugar and eggs in a mixing bowl; add half the grated orange rind and 1tbsp water.
  • Beat well with a wooden spoon until mixed. Spoon the mixture into the paper cake cases.
  • Bake for 15 mins. Remove the cakes from the muffin tins and place on a wire rack to cool.
  • Heat the orange juice in a small pan with the extra tbsp of sugar. Boil until syrupy.
  • Pour over the hot cakes, then sprinkle with the rest of the grated orange rind. Leave to cool before serving.

Notes

Whisper it: if everyone's allergy-free, these cakes are just as delicious made with butter and plain flour.

Gluten-Free Fresh Lemon Tart

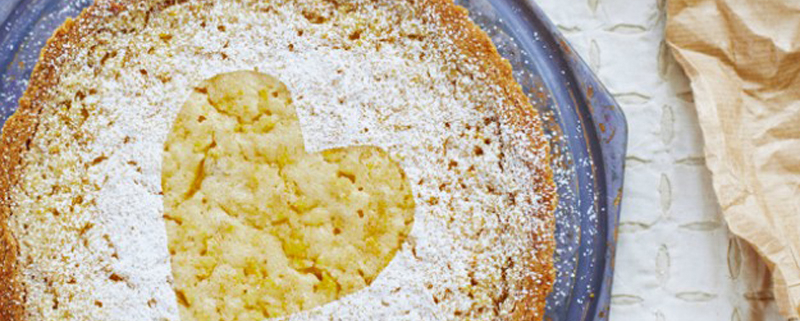
The Great British Bake Off’s gluten-free fresh lemon tart is citrus sweet and easy to make at home. For a special occasion there is little to beat a lemon tart. The shortbread-like crust for this one is made in a food processor with ground almonds and cornflour instead of flour, and is simply pressed into the tin. The filling is also made in the processor, from whole lemons blitzed with eggs, sugar, cornflour and butter. Those on a gluten-free diet can enjoy the tart along with everyone else. After baking, it is vital that the tart has time to cool and then chill in order to firm up the filling, so be sure to plan ahead.

Gluten-Free Fresh Lemon Tart

Prep Time 1 hr
Cook Time 55 mins
Total Time 1 hr 55 mins
Servings 8

Ingredients
  

For the crust

  • 200 g ground almonds
  • 35 g cornflour
  • 50 g caster sugar
  • 100 g unsalted butter chilled and diced

For the filling

  • 2 medium unwaxed lemons preferably thin-skinned
  • 15 g cornflour
  • 185 g caster sugar
  • 1 medium egg plus 1 yolk, at room temperature
  • 100 g unsalted butter melted and cooled
  • Icing sugar for dusting
  • If you fancy making our original lemon tart then try our classic recipe.

Instructions
 

  • To make the crust, put the ground almonds, cornflour and sugar into a food processor and ‘pulse’ just to combine. Add the butter and blitz just until the mixture looks like fine crumbs. Tip the crumbs into the buttered tin and press evenly over the base and up the sides (right to the rim) using the back of a spoon – the crust will be about 5mm thick. Chill for 20 minutes.
  • Heat the oven to 180°C/350°F/gas 4 and put the baking sheet into the oven to heat up. Bake the crust for 12–16 minutes until a very light gold colour.
  • Meanwhile, make the topping. Set the lemons on a large plate (to catch all the juice) and trim off the ends. Cut each lemon into 8 wedges, removing the pips. Cut each wedge across in half and put into the food processor. Combine the cornflour and caster sugar and add to the processor bowl. Blitz just until the lemon is coarsely chopped. Add the egg and yolk and blitz briefly until combined. With the machine running, pour in the cooled butter through the feed tube. Stop the machine as soon as all the butter has been added – the mixture won't be smooth but should have a few visible tiny pieces of lemon.
  • Remove the crust from the oven and set it (in its tin) on the heated baking sheet. Turn down the oven temperature to 170°C/325°F/gas 3. Pour the lemon mixture into the hot crust to fill it almost up to the rim. Carefully return to the oven and bake for 30–35 minutes until the lemon filling is just starting to colour and is firm when you gently jiggle the baking sheet.
  • Remove from the oven and leave to cool completely, then cover lightly and chill for at least 3 hours, or overnight. To serve, run a thin, round-bladed knife around the inside of the tin to loosen the crust, then carefully unmould the tart. Dust with icing sugar and serve with whipped cream or ice cream. Store in an airtight container in the fridge. Best eaten within 2 days.

Notes

For this recipe you will need: 1 x 20.5cm round, deep, loose-based sandwich tin, greased with butter; a baking sheet

Gluten-Free Raisin and Cinnamon Bread

This gluten-free raisin and cinnamon bread is a loaf with a difference. Sweet, spicy and utterly delicious, it’s perfect for spreading liberally with good quality butter. This bread can also be frozen, so it’s a great bake to have on standby for special breakfasts, lunchboxes or afternoon snacks.

Gluten-Free Raisin and Cinnamon Bread

Prep Time 20 mins
Cook Time 40 mins
Total Time 1 hr
Servings 10

Ingredients
  

  • 350 g gluten-free white bread flour
  • 150 g raisins
  • 2 level tsp easy-bake fast-action dried yeast
  • 1 tbsp ground cinnamon
  • 1 level tsp caster sugar
  • 1 level tsp salt
  • 1 level tsp xanthan gum
  • 250 ml milk
  • 1 large egg
  • 4 tbsp sunflower oil
  • 1 tsp vinegar

You will need

  • 1 lb loaf tin buttered

Instructions
 

  • Tip the flour into a bowl and stir in the raisins, yeast, cinnamon, sugar, salt and xanthan gum and mix well. Mix together the milk, egg, oil and vinegar.
  • Pour the milk mixture into the flour and mix well to give a soft dropping consistency.
  • Spoon the mixture into the tin and level the surface, leaving it slightly textured. Cover the tin loosely with oiled cling film and leave the loaf in a warm place to rise - until it's risen above the rim of the tin.
  • Set the oven to 220°C/425°F/Gas Mark 7. Bake loaf in the centre of preheated oven for 30-40 mins, or until it sounds hollow when tapped underneath, covering with a sheet of foil if it starts to brown too quickly. Remove from the oven and transfer to a wire rack to cool. Serve sliced, spread with butter.

Notes

Xantham gum is a common ingredient in gluten-free baking. It helps with crumb structure and creates a more consistent texture.
Create a smart shopping list
Turn this recipe into a shopping list you can print, email, view on your mobile or shop online. It's free!

Gluten-Free Bacon and Cheese Muffins

You can whip up a batch of these delicious gluten-free bacon and cheese muffins in next to no time. Eat them warm just as they are for breakfast or as a snack, or serve with soup for lunch. Use can also use them as a replacement for bread rolls, split and filled with soft cheese and tomatoes. They freeze well so why not make a batch so you always have some to hand. They’re ideal for packed lunches, for the office and school,l and when you’re out for the day and not sure if gluten-free food is going to be available.

Gluten-Free Bacon and Cheese Muffins

Prep Time 15 mins
Cook Time 25 mins
Total Time 40 mins
Servings 6

Ingredients
  

  • 3 rashers smoked bacon
  • 70 g fine polenta or cornmeal
  • 70 g gluten-free plain flour
  • 1 tsp gluten-free baking powder
  • 1/2 tsp bicarbonate of soda
  • 75 g mature Cheddar finely grated
  • 4 tbsp natural yogurt
  • 2 tbsp vegetable oil
  • 2 eggs
  • Pinch of cayenne pepper

Instructions
 

  • Preheat the oven to 180C/350F/Fan 160C/Gas Mark 4. Grease 6 holes of a muffin tin and line the bases with circles of baking paper (or line with paper muffin cases). Grill or fry the bacon until crisp, finely chop and set aside.
  • Place the polenta in a bowl and sift in the flour, baking powder, bicarbonate of soda and cayenne pepper. Season with salt and freshly ground pepper and stir in the Cheddar and chopped bacon.
  • In a separate bowl beat together the yogurt, oil and eggs. Add the dry ingredients and stir lightly and quickly to mix. The mixture should still be a bit lumpy, if over mixed the muffins will be heavier.
  • Divide the mixture between the muffin tins and bake for 20-25 mins until golden and just firm to the touch. Cool in the tin for 5 mins before turning out. Serve warm or cold.

Notes

For vegetarians replace the bacon with 50g cooked and chopped mushrooms or 75g wilted spinach, squeezed of excess liquid and finely chopped. Also ensure the cheese you use is suitable for vegetarians.

Gluten-Free Christmas Pudding

This extra fruity Christmas pudding recipe looks and tastes even better. It is too tempting to resist and is a classic dessert recipe at Christmas time. Decorated with fresh cranberries, this impressive pud can be a family favourite this Christmas

Gluten-Free Christmas Pudding

Prep Time 30 mins
Cook Time 6 hrs
Total Time 6 hrs 30 mins
Servings 12

Ingredients
  

  • 200 g each raisins and sultanas
  • 200 g each dried apricots and pitted prunes or figs
  • Grated zest and juice of 1 large orange
  • 1 eating apple
  • 1 rounded tsp ground cinnamon
  • 1 rounded tsp mixed spice or mixture of ground nutmeg, allspice and ground cloves
  • 3 rounded tbsp good marmalade or use honey for a sweeter pud
  • 6 tbsp Oloroso sherry
  • 5 tbsp brandy
  • 3 tbsp melted butter
  • 3 large eggs
  • 50 g flaked almonds
  • 100 g ground almonds
  • 125 g fresh white or brown breadcrumbs or crumbs made from gluten-free bread (we used Genius white)

To serve

  • A few fresh or frozen cranberries
  • Bay leaves brushed with gold lustre, optional
  • Posh cream see recipe
  • 1.2 litre pudding basin buttered, small disc of greaseproof in base, plus Bakewell paper, foil and string

Instructions
 

  • Put the raisins and sultanas in a large bowl. Use scissors to snip the apricots and prunes into small pieces, straight into the bowl. Add the orange zest and juice. Use the coarse side of a grater to grate the unpeeled apple straight in, working around the core. Stir in the spices, marmalade (or honey), sherry and brandy. Mix well, cover and leave overnight in a cool place (not the fridge), if you have time.
  • Stir in the butter, eggs, flaked and ground almonds and breadcrumbs. Spoon the mixture into the basin, pressing it down well. Cover with a piece of pleated paper, then pleated foil. Secure with string and make a string handle, if you want.
  • Cook in a steamer, with a tight-fitting lid, over boiling water for 5-6 hrs, checking and topping up the water every hour, so it doesn’t boil dry. Take the basin out and leave it to cool completely. Take off the paper
  • and foil and replace with cling film and foil. Store in a cool place for up to 3 mths.
  • To reheat: Take off the foil and cling film. Replace the cling film with a sheet of Bakewell and put the foil back on. Steam, as above, for 2 hrs. Leave to cool down for 20-30 mins, then turn out and serve with a few cranberries on top, and bay leaves, too, if liked, and…
  • To make the posh cream: Lightly whip 300ml double cream with 1 tbsp icing sugar and 1-2 tbsp Calvados or your favourite tipple. Or whisk 1 tbsp icing sugar with 2 tsp orange flower water, then whisk in 300ml cream to soft peaks. Chill until ready to serve.

Notes

You can save cooking time by using a pressure cooker - check its instructions for exact timings.
Create a smart shopping list
Turn this recipe into a shopping list you can print, email, view on your mobile or shop online. It's free!

Gluten-Free Banana Bread

Gluten-free banana bread is a dream for anyone with coeliac disease, or simply if you want to stay away from gluten. This banana bread tastes just as good as any classic recipe, except it’s gluten-free. This recipe will quickly become a family favourite and you’ll find yourself making it time and time again. Full of delicious and warming flavours like cinnamon and soft brown sugar, they pair perfectly with the banana in this recipe for spongey, soft and utterly irresistible banana bread. Just make sure you use bananas that are very ripe – even if you think they are overripe, they’ll work even better and add more flavour to your banana bread.

Gluten-Free Banana Bread

Prep Time 20 mins
Cook Time 50 mins
Total Time 1 hr 10 mins
Servings 8

Ingredients
  

  • 300 g gluten-free self-raising flour
  • 2 tsp gluten-free baking powder
  • 125 g soft brown sugar
  • 1/4 tsp ground cinnamon
  • 125 g butter melted, cooled slightly
  • 125 ml milk
  • 2 eggs
  • 3 large ripe bananas mashed
  • butter to serve
  • maple syrup to serve

Instructions
 

  • Preheat the oven to 170°C/325°F/Gas Mark 3. Grease a 21 x 11 cm (81⁄4 x 41⁄4 in) loaf tin. Line the base of the tin with baking paper.
  • Sift the flour, baking powder, sugar and cinnamon into a large bowl. In a separate bowl, whisk the butter, milk and egg together. Add the milk mixture to the dry ingredients with the mashed bananas. Use a wooden spoon to mix until well combined.
  • Pour the mixture into the prepared tin and smooth the surface with a spoon. Bake for 40 minutes, or until a skewer inserted into the centre comes out clean. Set aside in the tin for 5 minutes before turning out onto a wire rack to cool. Serve warm or at room temperature. Cut into slices, spread with butter and drizzle with a little maple syrup.

Notes

Need more ideas for gluten-free baking? Take a look at our selection of gluten-free cakes and bakes
Create a smart shopping list
Turn this recipe into a shopping list you can print, email, view on your mobile or shop online. It's free!