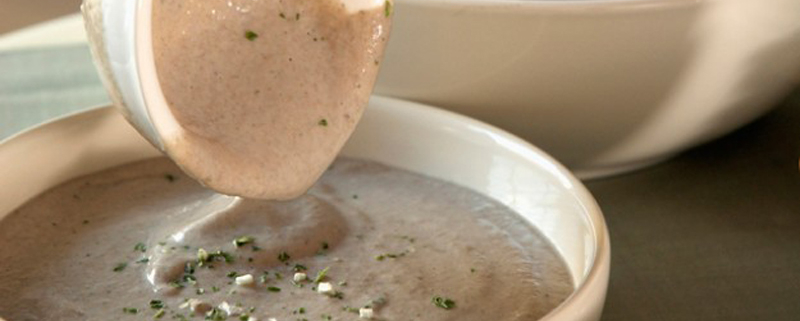
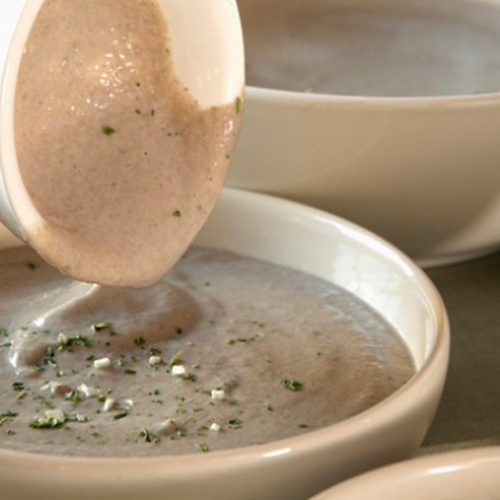
Healthy Recipes

Mushroom Soup

Mushroom soup is a really simple soup recipe to make and can be on the table in under an hour. Look out for value packs of mushrooms to use – they don’t need to be perfect looking or all the same shape.

Mushroom Soup

Prep Time 10 mins
Cook Time 25 mins
Total Time 35 mins
Servings 2

Ingredients
  

  • 50 g butter
  • 2 shallots finely chopped
  • 2 garlic cloves peeled and chopped
  • 400 g mushrooms wiped and roughly chopped
  • 600 ml vegetable stock
  • Salt and freshly ground black pepper
  • 100 ml double cream
  • Freshly chopped parsley and finely chopped mushroom to garnish

Instructions
 

  • Heat the butter in a large pan and fry the shallots and garlic for 5 mins until softened but not brown. Add the mushrooms and fry gently for 5 mins, stirring occasionally.
  • Pour in the stock and season with salt and freshly-ground black pepper. Simmer for 10 mins until the mushrooms are very tender.
  • Remove from the heat and leave to cool for 5 mins, then puree the soup with a stick blender or transfer to a food processor and process until smooth.
  • Stir the cream into the pureed soup and heat through gently for 2-3 mins. Adjust the seasoning to taste and serve in warmed bowls garnished with parsley and chopped mushroom.

Notes

For an extra earthy flavour, soak a handful of dried mixed mushrooms in boiling water for 30 mins then add the mushrooms and soaking liquid to the stock.

Potato Salad

This warm new potato salad recipe is great for serving as part of a summer buffet or as a quick and easy side dish. It has a light vinaigrette dressing but if you prefer a creamy one replace the oil and vinegar with 6 tbsp soured cream, mayonnaise or crème friache. Choose firm waxy salad potatoes with papery-thin skins such as Charlotte or Jersey Royals (if in season). This recipe serves 4 people and will take only 25 mins to make. Once you’ve perfected this classic potato salad recipe you’ll be making it time and time again.

Potato Salad

Prep Time 10 mins
Cook Time 15 mins
Total Time 25 mins
Servings 4

Ingredients
  

  • 1 kg salad potatoes scraped
  • 4 tbsp light olive oil
  • 2 tbsp cider vinegar
  • 1 tsp Dijon mustard
  • Pinch of caster sugar
  • Salt and freshly ground black pepper
  • 1 small red onion peeled and very finely diced
  • 2 tbsp fresh snipped chives
  • Few sprigs fresh tarragon

Instructions
 

  • Boil the potatoes in a large pan of lightly salted water for 10-12 mins until just tender. Drain well and leave to cool for 5 mins.
  • Place the oil, vinegar, mustard and sugar in a large serving bowl and whisk together until thoroughly blended. Season with salt and freshly ground black pepper.
  • Slice the warm potatoes and toss in the dressing with the red onion. Scatter over the snipped chives and tarragon and serve warm or cold.

Notes

Leave the skins on the potatoes for more flavour and fibre, just lightly scrub before boiling to remove any dirt.

Gluten-Free and Sugar-Free Carrot Cake

If you’re on a gluten-free diet and don’t want to miss out on a classic you’re going to love this carrot cake recipe. Not only is it gluten-free, it’s sugar-free too – swapping the usual caster sugar for Stevia or Splenda. The deliciously, thick cream cheese frosting turns this cake into a showstopper, just sprinkle with nuts and finish with grated carrot on top. This recipe uses lots of egg whites so we recommend that you use liquid egg whites, which you can find in the baking aisle in most supermarkets, so you don’t have to worry about what to do with all of those yolks!

Gluten-Free and Sugar-Free Carrot Cake

Prep Time 20 mins
Cook Time 1 hr 5 mins
Total Time 1 hr 25 mins
Servings 8

Ingredients
  

  • 113 g coconut flour
  • 113 g pecan flour
  • 21 g unsweetened shredded dried coconut lightly toasted
  • 400 g Splenda or Stevia Extract in the Raw or 200g New Roots Stevia Sugar
  • 2 tsps baking powder
  • tsps salt
  • tsps ground cinnamon
  • 8 egg whites or 6 eggs
  • 280 ml unsweetened soy milk or other milk
  • 113 g salted butter or margarine melted
  • 2 tsps vanilla extract
  • ¼ tsp liquid stevia
  • 340 g packed finely shredded carrots

For the cream cheese frosting

  • 680 g cream cheese at room temperature
  • 113 g salted butter or margarine at room temperature
  • 200 g Splenda or Stevia Extract in the Raw or 100g New Roots Stevia Sugar
  • ½ tsp ground cinnamon
  • 4 tsps vanilla extract
  • 1 tbsp unsweetened soy milk or other milk
  • tsp liquid stevia
  • Pecans or other nuts toasted and chopped, for garnish (optional)
  • Unsweetened coconut flakes toasted for garnish (optional)

Instructions
 

  • Preheat the oven to 160°C/325°F/Gas Mark 3. Line the bottom of two 8-inch round cake pans with parchment paper, then mist the inside walls of the pans along with the parchment with spray oil.
  • In a medium bowl, combine the coconut flour, pecan flour, shredded coconut, Splenda, baking powder, salt, and cinnamon and whisk until well mixed. In a large bowl, whisk the egg whites, milk, butter, vanilla, and liquid stevia together until thoroughly blended. Stir in the carrots. Add the flour mixture and stir with a large spoon for 1 to 2 minutes to make a thick, sticky batter. If the batter is too thick to pour, add a little more milk.
  • Pour the batter into the prepared pans. Use a spatula to evenly spread the batter, or jiggle the pan to evenly distribute the batter in the pan. Bake for 35 minutes, then switch racks and bake for about 30 more minutes, until the cakes are lightly golden and springy when pressed in the center and a toothpick inserted into the middle of each cake comes out clean. Let the cakes cool in the pans for at least 20 minutes.
  • Meanwhile, make the frosting. In the bowl of an electric mixer or a large bowl, combine all of the ingredients and mix with the paddle attachment on medium speed or stir vigorously with a large spoon until thoroughly blended. If using an electric mixer, switch to the whisk attachment and mix at medium-high speed for about 3 minutes, until the mixture is fluffy and very creamy; if mixing by hand, switch to a sturdy whisk and beat vigorously.
  • As the cakes cool, they should shrink from the pan walls; if not, run an icing spatula or a thin knife around the edges. Invert the cakes onto two plates. They can be eaten as they are or be frosted, either singly or as a two-layer cake.
  • For a two-layer cake, spread some frosting over the top of the lower layer, spreading it to an even thickness of about ¼ inch. Position the second layer on top and then spread the remaining frosting over the entire cake. Sprinkle the pecans, coconut, or both over the top and/or sides of the cake if you like. Keep refrigerated.

Notes

If you don't have coconut flour or pecan flour you could swap for regular flour instead, just make sure you use the same measurements

Gluten-Free Lemon Polenta Cake

This gluten-free lemon polenta cake with honey drizzle is a super fancy take on a classic lemon drizzle. The use of fine polenta gives this bake a crumbly, moist texture and piled high with berries and generously drizzled with fruity honey, it’s a sweet, summery winner.

Gluten-Free Lemon Polenta Cake

Prep Time 30 mins
Cook Time 1 hr 20 mins
Total Time 1 hr 50 mins
Servings 10

Ingredients
  

  • 250 g butter softened
  • 250 g caster sugar
  • 3 medium eggs beaten
  • 250 g ground almonds
  • Few drops of vanilla extract
  • Rind and juice of 1 lemon
  • 2 tbsp milk
  • 125 g fine polenta
  • 11/2 level tsp gluten-free baking powder

For the lemon syrup

  • Juice of 2 lemons
  • 6 tbsp honey
  • Icing sugar

For the topping

  • 150-170 g punnet raspberries
  • 180-200 g punnet blueberries
  • Sprigs of mint for decoration

You will need

  • 23 cm 9in cake tin, greased with butter and base lined with baking parchment

Instructions
 

  • Set the oven to 160°C/325°F/Gas Mark 3.
  • Beat the butter until soft and pale. Add the sugar and beat until light and creamy. Whisk in the egg, a little at a time. Gently fold in the almonds, vanilla, lemon rind and juice, milk, polenta and baking powder. Pour the mixture into the tin and level the surface. Bake for 50 mins-1hr, or until a skewer comes out clean after being inserted into the cake. If the cake is getting too dark, cover the top with foil after 30 mins. Remove from the oven and leave it in the tin.
  • To make the syrup, place the lemon juice and honey in a pan and stir in the icing sugar until it has dissolved. Spoon half the syrup over the cake while the cake and syrup are hot. Arrange the fruit on top. Re-warm the syrup and drizzle on top and decorate with sprigs of mint.

Notes

You could make this cake using other citrus fruits such as limes or oranges too.

Gluten-Free Lemon Shortbread Rounds

Beautifully quick and simple to make, these gluten-free lemon shortbread rounds have a zingy, buttery flavour and a lovely crumbly texture. Great as a gift for a gluten-free friend or relative, they look lovely stacked up and tied with a ribbon or packaged in a cellophane bag. If you’re feeling really creative, have a go at decorating them with a citrusy icing too.

Gluten-Free Lemon Shortbread Rounds

Prep Time 25 mins
Cook Time 15 mins
Total Time 40 mins
Servings 10

Ingredients
  

  • 250 g gluten-free flour eg, Doves Farm
  • Pinch of salt
  • 150 g butter
  • 90 g caster sugar
  • Zested rind of 1 lemon

You will need

  • Baking sheet lined with baking parchment

Instructions
 

  • Set the oven to 180°C/350°F/Gas Mark 4.
  • Tip the flour and salt into a bowl and rub the butter into them. Stir in the sugar and lemon rind. Mix the ingredients until they start to bind together to form a dough.
  • Shape the dough into a cylinder shape, about 6-7cm in diameter, and cut into rounds about 1cm thick. Place them on the lined baking sheet.
  • Bake for 10-15 mins, or until they start to turn lightly golden. Remove from the oven and leave them to cool on the baking sheet for a few mins. Transfer to a wire rack to cool completely.

Notes

For extra sweet shortbread, try removing the lemon zest and adding a handful of your favourite chocolate chips.

Gluten-Free Victoria Sponge

Going gluten-free can be tricky, but with recipes like this gluten-free Victoria sponge, you needn’t miss out on your favourites. This light and airy sponge is perfect alongside your afternoon cuppa – we like it filled with raspberry jam, but you can choose whichever flavour you like best.

Gluten-Free Victoria Sponge

Prep Time 25 mins
Cook Time 25 mins
Total Time 50 mins
Servings 8

Ingredients
  

For the cake

  • 175 g butter softened
  • 175 g caster sugar plus extra for dredging
  • 175 g self-raising gluten-free flour
  • 3 large eggs
  • 75 ml milk
  • Few drops of vanilla extract

For the filling

  • 150 ml whipping cream lightly whipped
  • 3-4 tbsp strawberry or raspberry jam

You will need

  • 2 x20cm 8in round sandwich tins, buttered and base lined

Instructions
 

  • Set the oven to 190°C/375°F/Gas Mark 5.
  • Tip the cake ingredients into a bowl and beat until smooth. Divide the mixture between the sandwich tins and spread out.
  • Bake the sponges for 20-25 mins, until they've risen and feel springy to the touch. Remove from the oven and leave to cool in the tins for about 5 mins, then transfer them to a wire rack to cook completely.
  • Fill with the cream and jam, and then dredge the top with caster sugar before serving.

Notes

The unfilled cooled cake may be wrapped in freezer bags and frozen for up to 1 month. Allow the cakes to defrost before filling with cream and jam.


Gluten-Free Chicken and Leek Pie

When you’re trying to avoid gluten, cooking comfort food can be a challenge, but with this easy gluten-free chicken and leek pie recipe, whipping up your favourite pie couldn’t be simpler. Packed with big chunks of meat, savoury leeks and rich, creamy sauce, you’ll never know the difference – and once you’ve mastered gluten-free pastry you can make all sorts of other classics too!

Gluten-Free Chicken and Leek Pie

Prep Time 30 mins
Cook Time 25 mins
Total Time 55 mins
Servings 6

Ingredients
  

  • 4 small cooked, skinned chicken breasts
  • 2 tsp vegetable oil
  • 2 onions finely chopped
  • 2 leeks trimmed, rinsed and sliced
  • 50 g butter
  • 50 g gluten-free flour
  • 600 ml milk

For the pastry

  • 300 g gluten-free plain flour
  • 150 g butter
  • 1 free-ranged egg yolk optional

You will need

  • 4 individual pie dishes

Instructions
 

  • For the filling: shred the chicken into strips and set aside. Heat the oil in a pan and fry the onion for 5 minutes until softened. Add the leeks and 2tsp water, then cook for 3 to 4 minutes until tender. Remove the onions and leeks from the pan and set aside. Add the butter to the pan and, when melted, stir in the flour. Cook until thickened, then gradually beat in the milk until smooth and season. Return the veg to the sauce. Cool in cling film.
  • For the pastry: place the flour and butter into a food processor and blend until it looks like breadcrumbs. Add 6tsp water and blend again for a few seconds until the mixture clumps together. Turn out, wrap in cling film and chill for 15 minutes.
  • Set the oven at 220°C/400°F/Gas Mark 6. Mix the chicken into the cooled sauce and divide between the dishes.
  • Dust the work top with gluten-free flour. Divide the pastry into 6 and roll each piece out until its 1cm larger than the top of the pie dish. Trim off 1cm wide strip around the edge of the pastry, and cut the strip into several smaller strips. Press the strips around the top edge each pie dish (to support the pastry lid). Dampen the pastry with water then lift the pastry lids on top and press down well to seal. Crimp the edge between your finger and thumb and brush the pastry with egg yolk. Put the pies in the oven and bake for 25 minutes until golden brown.

Notes

This gluten-free pastry can be used to top all of your favourite pie fillings - try using it with steak and ale or chicken and mushroom too!


Flourless Chocolate and Hazelnut Cake

Stuck for a nice dessert to cook? Look no further than this deliciously rich cake made with dark chocolate, Frangelico and hazlenuts – serve on it’s own or with pouring cream or ice cream to finish it off perfectly

Flourless Chocolate and Hazelnut Cake

Prep Time 20 mins
Cook Time 1 hr
Total Time 1 hr 20 mins
Servings 10

Ingredients
  

  • 500 g chopped dark chocolate
  • 6 eggs at room temperature
  • 2 tbsp Frangelico or brandy
  • 165 g ground hazelnuts
  • 250 ml cream whipped
  • Icing sugar to dust and cream, to serve

Instructions
 

  • Preheat the oven to 150°C/300°F/Gas 2. Grease a 20 cm (8 inch) round cake tin and line the base with baking paper.
  • Put the chocolate in a heatproof bowl. Half fill a saucepan with water, bring to the boil, then remove from the heat and sit the bowl over the pan (don’t let the bowl touch the water or the chocolate will get too
  • hot and seize). Stir occasionally until the chocolate melts.
  • Put the eggs in a heatproof bowl and add the Frangelico. Put the bowl over a pan of barely simmering water — don’t let it touch the water. Beat the eggs with electric beaters on high speed for 7 minutes, or until light and foamy. Remove from the heat.
  • Using a metal spoon, quickly and lightly fold the chocolate and ground hazelnuts into the eggs. Fold in the whipped cream and pour the mixture into the cake tin. Put the cake tin in a roasting tin and pour enough boiling water into the roasting tin to come halfway up the side of the cake tin. Bake for 1 hour, or until a skewer comes out clean when poked into the centre of the cake. Remove the cake tin from the water bath and cool to room temperature. Cover with plastic wrap and refrigerate overnight.
  • Turn out the cake onto a plate, remove the paper and cut into slices.
  • Dust with icing sugar and serve with cream.

Notes

This cake is perfect for any gluten-free friends or family members

Blueberry and Coconut Pancakes

Gluten-free and dairy free, these blueberry and coconut pancakes mean that everyone can enjoy pancakes this Pancake Day. They’re just as lovely as a weekend brunch option too

Blueberry and Coconut Pancakes

Prep Time 10 mins
Cook Time 10 mins
Total Time 20 mins
Servings 16

Ingredients
  

  • 55 g unsweetened desiccated coconut
  • 60 g quinoa flour
  • 1 tsp gluten-free baking powder
  • 1 medium egg
  • 160 g coconut milk
  • 30 g natural sweetener like Sweet Freedom
  • 1 tsp vanilla extract
  • 200 g blueberries plus extra to serve
  • Rapeseed oil or coconut oil to cook

For the syrupy orange topping

  • Finely grated zest of 1 orange
  • 225 ml orange Juice
  • 60 g natural sweetener or to taste
  • Segments of 4 large oranges

Instructions
 

  • Blitz the desiccated coconut in a food processor for 2-3 minutes. Add to a large bowl along with the quinoa flour and baking powder and mix together. Whisk in the coconut milk, egg, sweetener and vanilla extract until it forms a thick batter. Now leave the batter to stand for 20-30 minutes during which time it will thicken. Finally stir in the blueberries.
  • Heat a frying pan and lightly grease with the oil. Using a dessert spoon, pour one spoonful of the batter onto the pan and quickly spread the mixture out slightly with the back of the spoon. When the pancake is golden brown on the bottom and the top is beginning to set, carefully flip it over with a large palette knife. Gently press the pancake down onto the pan with the palette knife and cook until golden brown. Remove from the pan and keep warm whilst you cook the remaining pancakes - grease the pan between each batch and leave plenty of room between the pancakes to make it easier to flip them over.
  • To make the syrupy oranges, place the orange zest, sweetener and orange juice in a pan and boil until syrupy. Keep warm and just before serving add the orange segments.
  • Serve the pancakes with the syrupy oranges and some fresh blueberries.

Notes

It's best just to cook one pancake initially to test that the frying pan is at the right temperature - it really needs to be at a medium heat; too hot and the base will scorch before the middle is ready.